User flow
- Cashier selects “Pay with Crypto” on the POS.
- Customer chooses token and network on the POS (e.g., USDC on Solana/Ethereum).
- POS shows a WalletConnect QR.
- Customer scans with their wallet; session is established.
- POS requests the payment.
- Wallet displays amount and the customer approves.
- The transaction is broadcasted by the wallet.
- POS shows confirmation
SDK Methods
The WalletConnect POS SDK exposes methods and callbacks to create smooth payment flows.
The methods here are shown in isolation, for a full guide on how to use them follow to the step by step guide at the bottom.
Instance creation
To create a PosClient instance you have to pass projectId , deviceId and metadata
final posClient = PosClient(
 projectId: projectId,
 deviceId: 'unique_device_id',
 metadata: metadata,
);
metadata is as follows:
final metadata = Metadata(
  merchantName: 'Name of Merchant', // This will appear in the connect screen
  description: 'Short Description',
  url: 'url_web_page',
  logoIcon: 'https://example.com/icon.png',
);
Tokens Setup and Init SDK
The SDK needs to be initialized with the list of tokens that are supported to ensure that the interactions between the POS and the wallet will not be subjected to any compatibility problem.
final tokens = [
  PosToken(
    network: PosNetwork(name: 'Ethereum', chainId: 'eip155:1'),
    symbol: 'USDC',
    standard: 'erc20', // Token standard (erc20 for EVM tokens)
    address: '0xA0b86991c6218b36c1d19D4a2e9Eb0cE3606eB48', // USDC contract address on Ethereum
  ),
  PosToken(
    network: PosNetwork(name: 'Polygon', chainId: 'eip155:137'),
    symbol: 'USDC',
    standard: 'erc20',
    address: '0x2791Bca1f2de4661ED88A30C99A7a9449Aa84174', // USDC contract address on Polygon
  ),
];

// Set the tokens (this automatically configures supported networks)
posClient.setTokens(tokens: tokens);

await posClient.init(); // throws on error
InitializedEvent will be received through the onPosEvent subscription. This is not mandatory but could be useful in case you don’t want to await on the posClient.init() method.
When calling posClient.setTokens(tokens: tokens); you are essentially setting which tokens your POS Client would support. However, our Blockchain API might not support some networks, therefore, some tokens on those networks. During the init() method, our SDK will check the currently supported networks and filter out the unsupported tokens from your initial list based on the supported networks.
posClient.configuredTokens; will give you the list of tokens that would be actually supported.
Payment Intent
A payment intent is the server-side entity that specifies exactly what must be paid (asset, chain, amount) and how we will validate it.
// Create a payment intent
final paymentIntent = PaymentIntent(
  token: PosToken(
    network: PosNetwork(name: 'Ethereum', chainId: 'eip155:1'),
    symbol: 'USDC',
    standard: 'erc20',
    address: '0xA0b86991c6218b36c1d19D4a2e9Eb0cE3606eB48',
  ),
  amount: '25.50', // Amount as string (e.g., "12.5")
  recipient: '0xYourMerchantAddress', // Your wallet address
);

// Create the payment intent
await posClient.createPaymentIntent(paymentIntents: [paymentIntent]);
PaymentIntent has the following fields
@freezed
sealed class PaymentIntent with _$PaymentIntent {
  const factory PaymentIntent({
    required PosToken token,   // PosToken value (see below)
    required String amount,    // double as String, i.e. `12.5`
    required String recipient, // recipient address, 0x..... for EVM
  }) = _PaymentIntent;
}

@freezed
sealed class PosToken with _$PosToken {
  const factory PosToken({
    required PosNetwork network, // PosNetwork value (see below)
    required String symbol, // i.e. USDC, USDT
    required String standard, // `erc20` for EVM, `token` for Solana, `trc20` for Tron
    required String address, // Contract address on the given chain
  }) = _PosToken;
}

sealed class PosNetwork with _$PosNetwork {
  const factory PosNetwork({
    required String name, // i.e. `Ethereum`
    required String chainId // CAIP-2 chainId. i.e `eip155:1`
    }) = _PosNetwork;
}
- Generates the connection URL
- Sends the connection proposal to the wallet
- Awaits the connection result
- Builds and sends the transaction to the wallet
- Awaits the transaction result from the wallet
- Checks the transaction status
Payment intent life cycle
The WalletConnect POS comes with a subscription mechanism to listens to a set of different event messages allowing the POS UI to adapt depending on the status of whole transaction.
// events.dart
abstract class PosEvent extends EventArgs {}

class InitializedEvent extends PosEvent {}

// connection events

class QrReadyEvent extends PosEvent {
  final Uri uri;
  QrReadyEvent(this.uri);
}

class ConnectedEvent extends PosEvent {}

// payment request events
class PaymentRequestedEvent extends PosEvent {}

// payments checking events
class PaymentBroadcastedEvent extends PosEvent {}
class PaymentSuccessfulEvent extends PosEvent {
  final String txHash;
  PaymentSuccessfulEvent(this.txHash);
}

class DisconnectedEvent extends PosEvent {}
PosEvent:
// events.dart
abstract class PosErrorEvent extends PosEvent {}

// connection events
class ConnectRejectedEvent extends PosErrorEvent {}
class ConnectFailedEvent extends PosErrorEvent {
  final String message;
  ConnectFailedEvent(this.message);
}

// payment request events
class PaymentRequestRejectedEvent extends PosErrorEvent {}
class PaymentRequestFailedEvent extends PosErrorEvent {
  final String message;
  final PosApiError apiError;
  final String shortMessage;
  PaymentRequestFailedEvent(
    this.message, [
    this.apiError = PosApiError.unknown,
    this.shortMessage = '',
  ]);
}

// payments checking events
class PaymentFailedEvent extends PosErrorEvent {
  final String message;
  final PosApiError apiError;
  final String shortMessage;
  PaymentFailedEvent(
    this.message, [
    this.apiError = PosApiError.unknown,
    this.shortMessage = '',
  ]);
}
PaymentRequestFailedEvent and PaymentFailedEvent contains an optional PosApiError apiError object and optional String shortMessage both with the purpose of properly identifying the given error from the RPC Service
PosApiError could be one of the following options…
enum PosApiError {
  invalidAsset,
  invalidRecipient,
  invalidSender,
  invalidAmount,
  invalidAddress,
  invalidWalletResponse,
  invalidTransactionId,
  failedToEstimateGas,
  invalidProviderUrl,
  rpcError,
  internal,
  invalidFormat,
  invalidChainId,
  insufficientFundsForTransfer,
  transferAmountExceedsBalance,
  broadcastFailed,
  unknown,
}
shortMessage value would contain a Plain Text message representation of the given PosApiError
For example, if you receive a PosApiError.transferAmountExceedsBalance error on PaymentRequestFailedEvent event the shortMessage value will be “Transfer amount exceeds balance”. You will still receive the full jsonRPCError message through the message value
Listening to events:
posClient.onPosEvent.subscribe((event) {
  if (event is QrReadyEvent) {
    // When payment intent is created and connection with the relay is established, this event will contain the pairing URI to create the QR.
    // You can use your own QR Widget but `QrImageView(data: uri)` Widget is available for you to use.
    status = '1. Scan QR code with your wallet';
  } else if (event is ConnectRejectedEvent) {
    // User rejected the wallet connection
    status = '2. User rejected session';
  } else if (event is ConnectFailedEvent) {
    // Connection failed with error message
    status = '2. Connection failed: ${event.message}';
  } else if (event is ConnectedEvent) {
    // Customer connected their wallet upon scanning the QR code with the pairing URI
    status = '2. Connected!';
  } else if (event is PaymentRequestedEvent) {
    // Payment has been sent to the wallet for user approval
    status = '3. Requesting payment...';
  } else if (event is PaymentRequestRejectedEvent) {
    // User rejected the payment request
    status = '3. User rejected payment.';
    final PosApiError apiError = event.apiError;
    final String shortMessage = event.shortMessage;
    final String fullErrorMessage = event.message;
  } else if (event is PaymentFailedEvent) {
    // Payment request failed
    status = '3. Payment request failed.';
  } else if (event is PaymentBroadcastedEvent) {
    // User approved the payment and transaction was broadcasted
    status = '4. Payment broadcasted, waiting confirmation...';
  } else if (event is PaymentFailedEvent) {
    // Payment failed with error message
    status = '4. Payment failed: ${event.message}';
    final PosApiError apiError = event.apiError;
    final String shortMessage = event.shortMessage;
    final String fullErrorMessage = event.message;
  } else if (event is PaymentSuccessfulEvent) {
    // Payment has been confirmed on the blockchain
    status = '4. Payment successful!. Hash: ${event.txHash}';
  } else if (event is DisconnectedEvent) {
    // Session disconnected
    status = '5. Disconnected';
  }
});
Restart the payment flow:
The SDK provides a restart() function to handle payment flow interruptions and restarts:
// Full reinitialization, clears all state
// Mainly if you want to call init() again
// ✅ recommended option to fully restart the flow, requires setTokens() and init() to be called again
await posClient.restart(reinit: true);

// If for some reason you don't want/need to fully restart the flow don't use `reinit:`
// Abort current payment and restart the flow
await posClient.restart();
- Abort ongoing payment: When a customer wants to cancel or restart the payment process
- Payment completion: After a successful or failed payment to prepare for the next transaction
- Error recovery: When you need to reset the SDK state due to errors
- Full reset: Use
reinit: true to completely clear the instance and require calling init() and setTokens() again
What happens during restart:
- Completes any pending status checks
- Clears the current payment intent
- Expires previous pairings
- Aborts ongoing connection attempts
Step by Step Guide
Prerequisites
To use the POS SDK you will need the following:
- Project ID from the Reown Dashboard (dashboard.reown.com).
- Requirements: Flutter 3.22+, Dart 3.x, Android min SDK 23, iOS 13+.
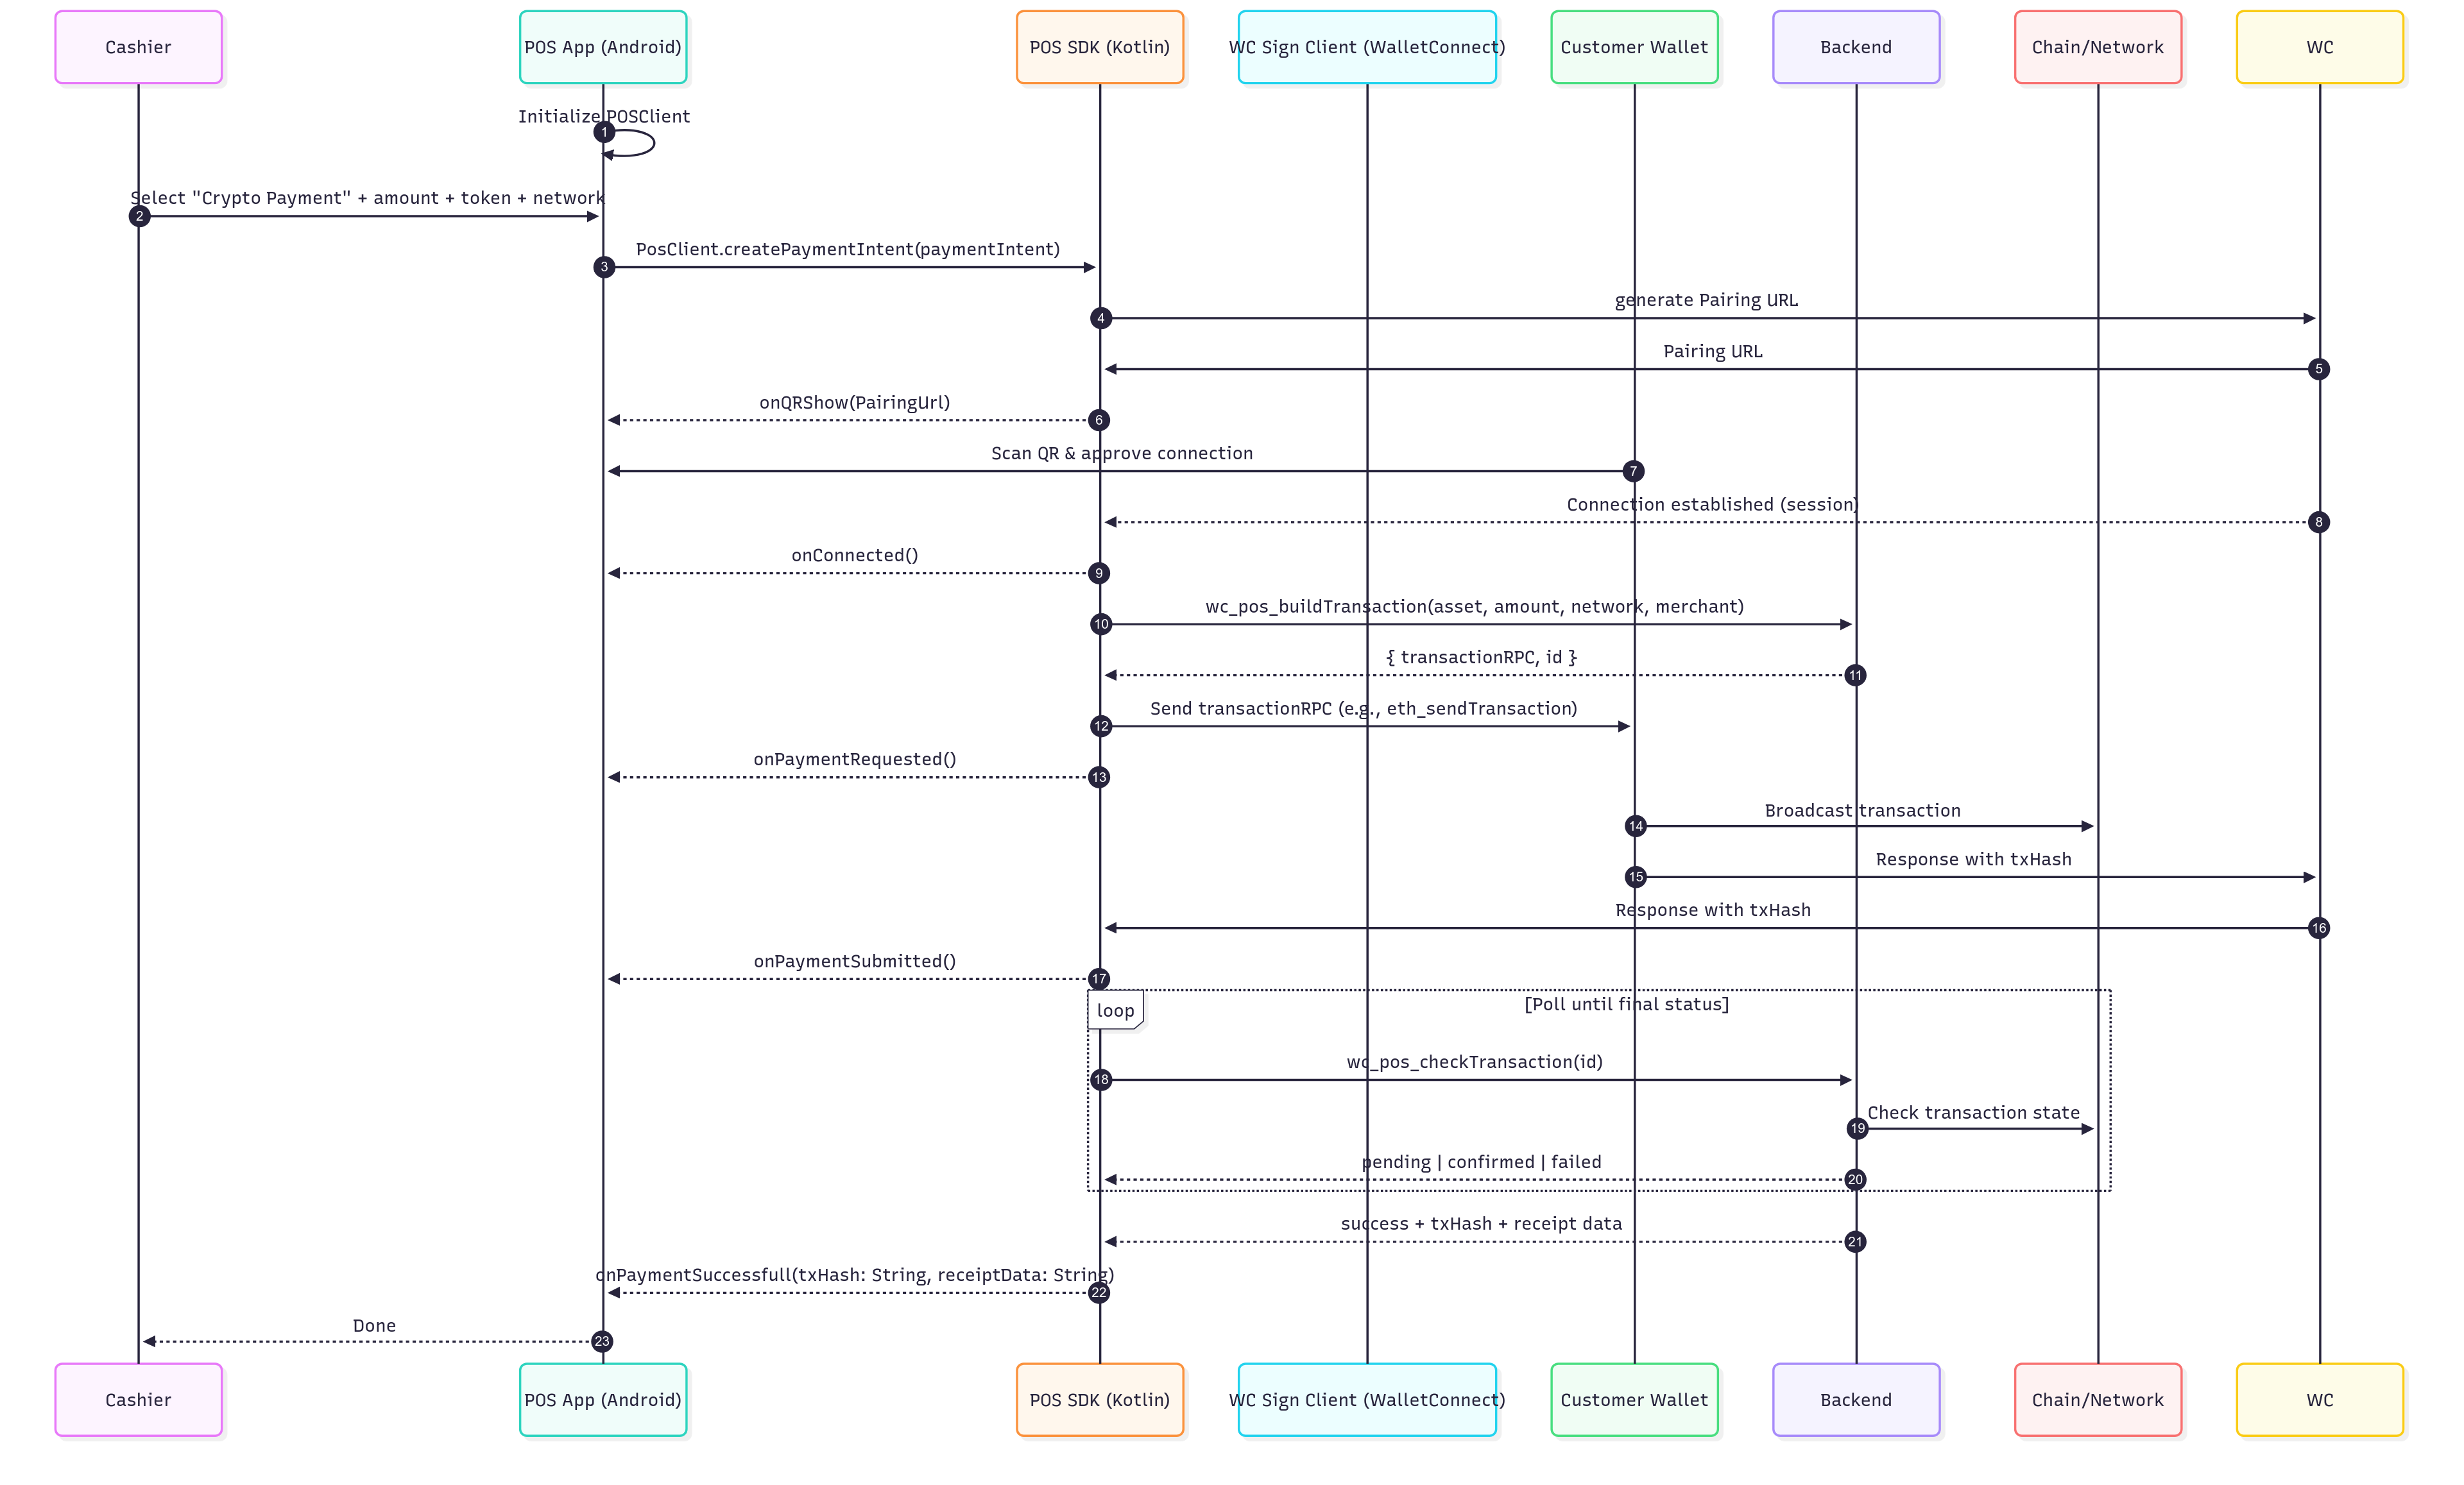
Sequence Diagram
Step 1 - Add Dependencies
First, install the dependency by running the following command:
flutter pub add pos_client
Step 2 - Complete reproducible example
import 'package:flutter/material.dart';
import 'package:pos_client/pos_client.dart';

class PaymentScreen extends StatefulWidget {
  const PaymentScreen({super.key});

  @override
  State<PaymentScreen> createState() => _PaymentScreenState();
}

class _PaymentScreenState extends State<PaymentScreen> {
  PosEvent? _event;
  String status = '';
  late final IPosClient posClient;

	// USDC on Arbitrum
  final supportedToken = PosToken(
    network: PosNetwork(name: 'Arbitrum One', chainId: 'eip155:42161'),
    symbol: 'USDC',
    standard: 'erc20',
    address: '0xaf88d065e77c8cC2239327C5EDb3A432268e5831',
  );

  @override
  void initState() {
    super.initState();
    // [PosClient SDK API] 1. Construct your PosClient instance
    final metadata = Metadata(
      merchantName: 'Merchant Name',
      description: 'Secure Crypto Payment Terminal',
      url: 'https://merchant-url.com',
      logoIcon: 'https://merchant-url.com/icon.png',
    );
    posClient = PosClient(
      projectId: '87....', // TODO set your own project ID
      deviceId: 'device_id',
      metadata: metadata,
    );
    // [PosClient SDK API] 2. call setTokens to construct namespaces with your supported tokens and network
    posClient.setTokens(
      tokens: [
        supportedToken,
      ],
    );

    // [PosClient SDK API] 3. Subscribe to events
    posClient.onPosEvent.subscribe(_onPosEvent);

    // [PosClient SDK API] 4. initialize PosClient SDK. Can be awaited if needed
    posClient.init().then((_) {
      // [PosClient SDK API] 5. create a payment intent with the PaymentIntent. Can be awaited if needed
      posClient.createPaymentIntent(
        paymentIntents: [
          PaymentIntent(
            token: posClient.configuredTokens.first,
            amount: '1.0',
            recipient: '0xD6....', // TODO set your own recipient
          ),
        ],
      );
    });
  }

  void _onPosEvent(PosEvent event) {
    setState(() {
      if (event is QrReadyEvent) {
        status += '1. Scan QR code with your wallet';
      } else if (event is ConnectRejectedEvent) {
        status += '\n2. User rejected session';
      } else if (event is ConnectFailedEvent) {
        status += '\n2. Connection failed: ${event.message}';
      } else if (event is ConnectedEvent) {
        status += '\n2. Connected!';
      } else if (event is PaymentRequestedEvent) {
        status += '\n3. Requesting payment...';
      } else if (event is PaymentRequestRejectedEvent) {
        status += '\n3. User rejected payment.';
      } else if (event is PaymentBroadcastedEvent) {
        status += '\n4. Payment broadcasted, waiting confirmation...';
      } else if (event is PaymentFailedEvent) {
        status += '\n4. Payment failed: ${event.message}';
      } else if (event is PaymentSuccessfulEvent) {
        status += '\n4. Payment successful!. Hash: ${event.txHash}';
      } else if (event is DisconnectedEvent) {
        status += '\n5. Disconnected';
      }
      _event = event;
    });
  }

  @override
  Widget build(BuildContext context) {
    return Scaffold(
      appBar: AppBar(title: Text('Crypto Payment')),
      body: Center(
        child: Column(
          mainAxisAlignment: MainAxisAlignment.center,
          children: [
            (_event is QrReadyEvent)
                ? QrImageView(
                    data: (_event as QrReadyEvent).uri.toString(),
                    size: 250,
                  )
                : SizedBox.shrink(),
            SizedBox(height: 20),
            Padding(padding: const EdgeInsets.all(8.0), child: Text(status)),
          ],
        ),
      ),
    );
  }
}
Troubleshooting
Customer scans QR but has no stablecoin or gas
Situation:
Customer scans the POS QR, wallet opens, but if they have no balance or insufficient gas, they end up stuck on the wallet home.
Root cause:
When the POS calls wc_pos_buildTransaction, the server simulates/estimates the transaction. If the user has no gas or token balance, the simulation fails and the server returns an error. This prevents the transaction from failing on-chain. The Flutter SDK surfaces this as part of PaymentRequestFailedEvent(message)
How to handle with the SDK:
- Subscribe to
onPosEvent and catch PaymentRequestFailedEvent.
- Map these to a Declined screen in your POS with three options:
- Try again → call
createPaymentIntent([...]) again.
- Change token/network → allow selecting another configured
PosToken, then re-issue createPaymentIntent.
- Cancel → call
restart(reinit: true), then re-init and re-set tokens to generate a new QR.
UI copy guidance:
- Error message contains “insufficient funds” → show “Declined — not enough network gas to send.”
- Error message indicates token shortfall → show “Declined — insufficient . Choose another token or top up.”
Customer taps Connect then cancels; QR cannot be reused
Situation:
Customer scans and connects the wallet but cancels on the connection or payment screen. Re-scanning the same QR within a few minutes does not work.
Root cause:
Pairing URIs are single-use. If the wallet rejects or cancels, the pairing is invalid. Re-using the same QR fails. The SDK emits either ConnectRejectedEvent or ConnectFailedEvent(message).
How to handle with the SDK:
- On
ConnectRejectedEvent or ConnectFailedEvent, always:
- Call
restart(reinit: true) to clear state and expire pairing.
- Call
init() and setTokens().
- Call
createPaymentIntent([...]) to get a fresh QrReadyEvent with a new URI.
- Show the new QR to the user. Do not re-display the canceled one.
UI copy guidance:
- Connection rejected: “Declined — connection rejected in wallet. Scan again.”
- Connection failed: “Unable to connect. New code generated.”
Considerations
- Gas: Users need network gas unless a PSP integrates a paymaster
- Stablecoin-only: Volatile crypto assets not supported yet
- Connectivity: Real-time onchain confirmation requires internet access
- Ops Integration: Refunds and reconciliation require PSP-side workflow integration